
Introduction to The Business Prototyping Toolkit
The key components of the Business Prototyping Toolkit and building System Dynamics models, Agent-based models and hybrid models using a simple example.
Oliver Grasl
17.8.2021
An introduction to the components of the Business Prototyping Toolkit and an illustration of how to build System Dynamics models, agent-based models and hybrid models using a simple example.
The Business Prototyping Toolkit (BPTK) is a computational modeling framework that enables you to build simulation models using System Dynamics (SD) and/or agent-based modeling (ABM) and manage simulation scenarios with ease.
The framework is used to build models of markets, business models, organizations and entire business ecosystems. It can be used to build small, explorative models (as illustrated here) as well as large models with hundreds of thousands of equations.
The guiding principle of the framework is to let the modeler concentrate on building simulation models by providing a seamless interface for managing model settings and scenarios and for plotting simulation results. It takes a "minimalistic" approach and just provides the necessary modeling and simulation functionality. It standard open source packages for everything else, in particular it relies on environments such as Jupyter to provide plotting and interactive dashboards.
- All plotting is done using Matplotlib.
- Simulation results are returned as pandas DataFrames.
- Numerics via NumPy and SciPy.
Model settings and scenarios are kept in JSON files. These settings are automatically loaded by the framework upon initialization, as are the model classes themselves. This makes interactive modeling, coding and testing very painless, especially if using the Jupyter notebook environment.
Next to a Jupyter notebook version of this notebook online and advanced tutorials and examples on GitHub, you can also find extensive documentation online.
Key Components of The Business Prototyping Toolkit
The toolkit has been available since 2018 and meanwhile offers modeling in Python for Agent-based modeling (ABM), System Dynamics Modeling (SD) and hybrid modeling using both SD and ABM.
There is also support for importing XMILE models created with external modeling environments, such as isee systems Stella Architect or iThink modeling environments.
Once you have a model, you can then define and manage different simulation scenarios, plot the results of those scenarios and build interactive dashboards.
The framework also provides a simple REST API server that easily lets you serve up and query models using web technology. You can then use the BPTK Widget Library to build web dashboards.

You can view an example dashboard illustrating different COVID-Scenarios online, the repositories for the dashboard and simulation are available on GitHub.
Example Model: Simulating Customer Acquisition Using The Bass Diffusion Model
To illustrate the different ways of building simulation models using BPTK, we will use a simple model of customer acquisition known as the Bass Diffusion Model. It describes the process of how new products or services are adopted by consumers.
We will build the model using the System Dynamics DSL, Agent-based modeling, a hybrid ABM and SD DSL model and an XMILE.
The basic structure of the model is illustrated in the following causal loop diagram:

Building The Customer Acquisition Model With SD DSL
Based on the causal loop diagram, we will implement a stock and flow model with the following stocks, flows, converters and constants:

Building The Model
Setting up the model using the SD DSL is quite easy. We first instantiate a model class, which will be the container that holds the model elements. This ensures you can run multiple models in parallel.
from BPTK_Py import Modelfrom BPTK_Py import sd_functions as sdmodel = Model(starttime=1.0,stoptime=60.0, dt=1.0, name="Customer Acquisition SDDSL")# stockscustomers = model.stock("customers")potential_customers = model.stock("potential_customers")#flowscustomer_acquisition=model.flow("customer_acquisition")#convertersacquisition_through_advertising = model.converter("acquisition_through_advertising")acquisition_through_word_of_mouth = model.converter("acquisition_through_word_of_mouth")consumers_reached_through_advertising = model.converter("consumers_reached_through_advertising")consumers_reached_through_word_of_mouth= model.converter("consumers_reached_through_word_of_mouth")market_saturation = model.converter("market_saturation")#constantsinitial_customers = model.constant("initial_customers")initial_potential_customers = model.constant("initial_potential_customers")advertising_success = model.constant("advertising_success")consumers_reached_per_euro = model.constant("consumers_reached_per_ruro")advertising_budget = model.constant("advertising_budget")word_of_mouth_success = model.constant("word_of_mouth_success")contact_rate = model.constant("contact_rate")
Now that we have defined all the model elements, we need to define the actual equations. The neat thing is that we can write these equations directly using the model elements.
#equationscustomers.equation = customer_acquisitionpotential_customers.equation = -customer_acquisitioncustomer_acquisition.equation=sd.min(potential_customers,acquisition_through_advertising+acquisition_through_word_of_mouth)acquisition_through_advertising.equation = advertising_success*consumers_reached_through_advertisingconsumers_reached_through_advertising.equation = consumers_reached_per_euro*advertising_budget*(1-market_saturation)market_saturation.equation = customers/(customers+potential_customers)acquisition_through_word_of_mouth.equation = word_of_mouth_success*consumers_reached_through_word_of_mouthconsumers_reached_through_word_of_mouth.equation=contact_rate*customers*(1-market_saturation)
We also need to initiale the stocks and set the constants.
#initialize modelcustomers.initial_value=initial_customerspotential_customers.initial_value=initial_potential_customersinitial_customers.equation = 0.0initial_potential_customers.equation = 60000.0advertising_success.equation = 0.1consumers_reached_per_euro.equation = 100.0advertising_budget.equation = 100.0word_of_mouth_success.equation = 0.01contact_rate.equation = 10.0
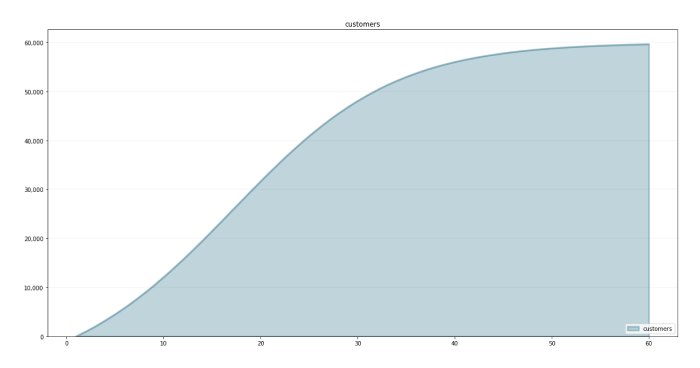
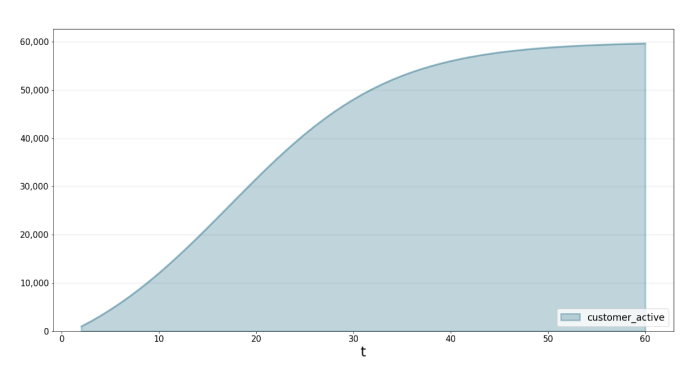
The model is now complete and we can directly plot the behavior of the model elements over time:
customers.plot()
Of course you can also access the underlying Pandas dataframe:
customers.plot(return_df=True)[1:10]
For debugging purposes it can be useful to take a look at the internat representation of the model equations - these are stored as Python lambda functions.<div><style scoped>.dataframe tbody tr th:only-of-type {vertical-align: middle;}.dataframe tbody tr th {vertical-align: top;}.dataframe thead th {text-align: right;}</style><table border="1" class="dataframe"><thead><tr style="text-align: right;"><th></th><th>customers</th></tr></thead><tbody><tr><th>1.0</th><td>0.000000</td></tr><tr><th>2.0</th><td>1000.000000</td></tr><tr><th>3.0</th><td>2081.666667</td></tr><tr><th>4.0</th><td>3247.916662</td></tr><tr><th>5.0</th><td>4500.994779</td></tr><tr><th>6.0</th><td>5842.312754</td></tr><tr><th>7.0</th><td>7272.284453</td></tr><tr><th>8.0</th><td>8790.164623</td></tr><tr><th>9.0</th><td>10393.900018</td></tr><tr><th>10.0</th><td>12080.003090</td></tr></tbody></table></div>
customers.function_string
if"lambda model, t : ( (model.memoize('initial_customers',t))
(t <= model.starttime) else (model.memoize('customers',t-model.dt))+ model.dt*(model.memoize('customer_acquisition',t-model.dt)) )"
customer_acquisition.function_string"lambda model, t : max( 0,min( model.memoize('potential_customers',t), model.memoize('acquisition_through_advertising',t)+model.memoize('acquisition_through_word_of_mouth',t)))"
Setting up Scenarios
Scenarios are just particular settings for the constants and graphical functions in your model and scenario managers are a simple way of grouping scenarios.
You can create scenarios directly in Python (which we will do here), but the easiest way to maintain them is to keep them in separate JSON files - you can define as many scenario managers and scenarios in a file as you would like and use as many files as you would like.
Each scenario manager references the model it pertains to. So you can run multiple simulation models in one notebook.
All the scenario definition files are kept in the
/ folder. The BPTK_Py framework will automatically scan this folder and load the scenarios ‚ including the underlying simulation models - into memory.scenarios
scenario_manager={"sddsl_customer_acquisition":{"model":model,"base_constants":{"initial_customers" : 0.0,"initial_potential_customers" : 60000.0,"advertising_success": 0.1,"consumers_reached_per_euro" : 100.0,"advertising_budget" : 100.0,"word_of_mouth_success": 0.01,"contact_rate" : 10.0}}}
To manage the scenarios you need to instantiate the bptk class - this class stores the scenario managers and scenarios and provides lot's of convenient functions to plot data, export model results or import data.
A convenient feature of scenarios is that you only have to define variables that change - essentially the scenario manager first takes the constants as set in the model itself and then overrides them with the settings from the scenario.import BPTK_Pybptk = BPTK_Py.bptk()bptk.register_scenario_manager(scenario_manager)
bptk.register_scenarios(scenario_manager="sddsl_customer_acquisition",scenarios={"base":{},"low_word_of_mouth":{"constants":{"word_of_mouth_success":0.001}},
"high_word_of_mouth":{"constants":{"word_of_mouth_success":0.1}},"interactive_scenario":{}})
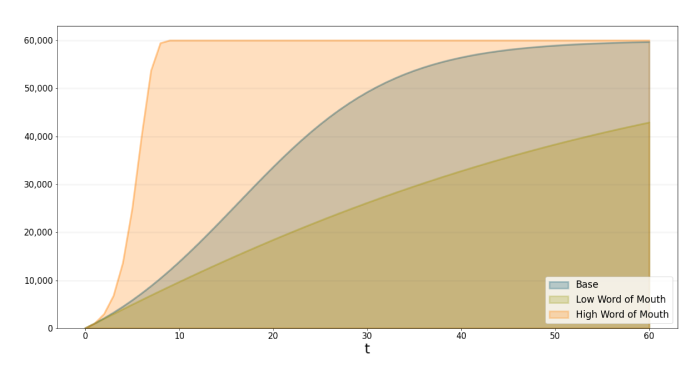
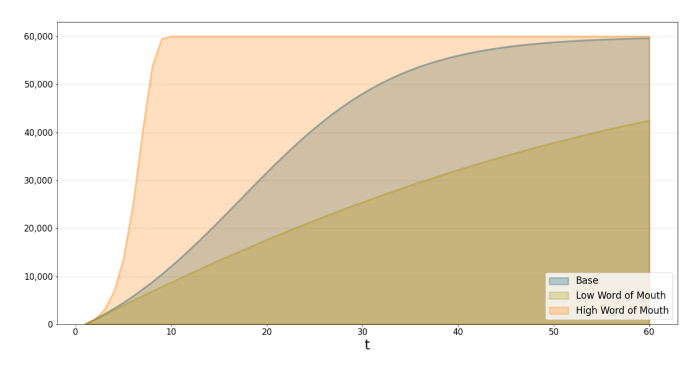
bptk.plot_scenarios(scenario_managers=["sddsl_customer_acquisition"],scenarios=["base","low_word_of_mouth","high_word_of_mouth"],equations=["customers"],series_names={"sddsl_customer_acquisition_base_customers":"Base","sddsl_customer_acquisition_low_word_of_mouth_customers":"Low Word of Mouth","sddsl_customer_acquisition_high_word_of_mouth_customers":"High Word of Mouth",})
bptk.get_scenario_names([],format="dict")
{'xmile_customer_acquisition': ['base',
'low_word_of_mouth',
'high_word_of_mouth'],
'sddsl_customer_acquisition': ['base',
'low_word_of_mouth',
'high_word_of_mouth',
'interactive_scenario']}
Building an Interactive UI
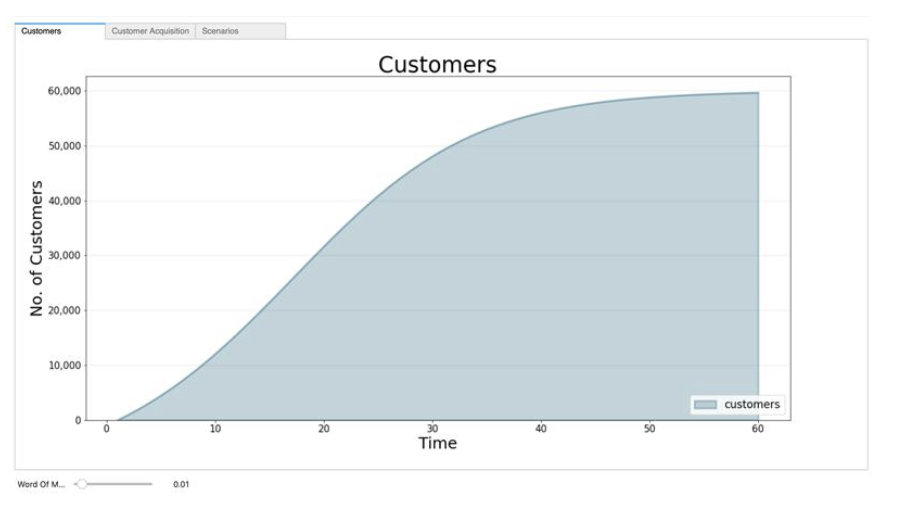
It is easy to build interactive dashboards in Jupyter using IPywidgets – all you need from BPTK is the ability to plot graphs.
%matplotlib inlineimport matplotlib.pyplot as pltfrom ipywidgets import interactimport ipywidgets as widgetscustomerTab = widgets.Output()customerAcquisitionTab = widgets.Output()scenariosTab = widgets.Output()
tabs = widgets.Tab(children = [customerTab, customerAcquisitionTab,scenariosTab])tabs.set_title(0, 'Customers')tabs.set_title(1, 'Customer Acquisition')tabs.set_title(2, 'Scenarios')display(tabs)@interact(word_of_mouth_success=widgets.FloatSlider(value=0.01,min=0.001,max=0.1,step=0.001,continuous_update=False,description='Word Of Mouth Success'))
def dashboardWithTabs(word_of_mouth_success):scenario= bptk.get_scenario("sddsl_customer_acquisition","interactive_scenario")scenario.constants["word_of_mouth_success"]=word_of_mouth_successbptk.reset_scenario_cache(scenario_manager="sddsl_customer_acquisition",scenario="interactive_scenario")
with customerTab:
# turn of pyplot's interactive mode to ensure the plot is not created directlyplt.ioff()# clear the widgets output ... otherwise we will end up with a long list of plots, one for each change of settingscustomerTab.clear_output()# create the plot, but don't show it yetbptk.plot_scenarios(scenario_managers=["sddsl_customer_acquisition"],scenarios=["interactive_scenario"],equations=['customers'],title="Customers",freq="M",x_label="Time",y_label="No. of Customers")# show the plotplt.show()# turn interactive mode on againplt.ion()with customerAcquisitionTab:plt.ioff()customerAcquisitionTab.clear_output()bptk.plot_scenarios(scenario_managers=["sddsl_customer_acquisition"],scenarios=["interactive_scenario"],equations=['customer_acquisition'],title="Customer Acquisition",freq="M",x_label="Time",y_label="No. of Customers")plt.show()plt.ion()with scenariosTab:plt.ioff()scenariosTab.clear_output()bptk.plot_scenarios(scenario_managers=["sddsl_customer_acquisition"],scenarios=["base","low_word_of_mouth","high_word_of_mouth","interactive_scenario"],equations=["customers"],series_names={"sddsl_customer_acquisition_base_customers":"Base","sddsl_customer_acquisition_interactive_scenario_customers":"Interactive","sddsl_customer_acquisition_low_word_of_mouth_customers":"Low Word of Mouth","sddsl_customer_acquisition_high_word_of_mouth_customers":"High Word of Mouth",}),plt.show()plt.ion()```
Tab(children=(Output(), Output(), Output()), _titles={'0': 'Customers', '1': 'Customer Acquisition', '2': 'Sce...interactive(children=(FloatSlider(value=0.01, continuous_update=False, description='Word Of Mouth Success', ma...
NOTE: especially for larger models it is much better to keep the model and the scenario definitions in separate files, which of course is also possible. See the online documentation and detailed tutorial for illustrations of how this can be done.
Customer Acquisition Using Agent-based Modeling
The basic concept behind Agent-based models is quite simple: you populate an environment (the model) with a set of agents. Agents and the environment each have a set of properties and each agent must always be in a defined state.
Agents can perform actions and interact amongst each other and with the environment by sending each other events - the agents react to these events by updating their properties and/or changing their state.

So to create an agent using Python and the BPTK framework, all you really need to do is:
- Identify the relevant agents
- Define the agents' properties
- For each agent, implement an initializer that sets the agents initial state
- Define handlers for each kind of event you want your agent to react to
- Define an action method, which describes what the agent does in each time-step, e.g. perform internal tasks and send events to other agents
Defining the model is even easier:
- Define the environment properties and update them when necessary
- Tell the model which kinds of agents there are
- Then, to configure the simulation, all we need to do is to set the initial values of the properties and instantiate the initial agents. Each unique configuration of a model is referred to as a scenario. The BPTK framework helps you to manage different scenarios and compare results easily.
Configuring Agent-based models is best done using a config file defined in JSON.
Agent-based modeling is a very powerful approach and you can build models using ABM that you cannot build using SD. This power comes at a price though: because each agent is modeled as an individual entity, agent-based models are quite slow.
Setting up The Model
For the customer acquisition model, we really just need two agents: the company that sends advertising events and the consumers that receive those events. If a consumer becomes a customer, then the consumer starts sending word-of-mouth events.
This is illustrated in the following diagram:

Note that the advertising budget and the contact rate are properties of the respective agents – this is a glimpse at the power of agent-based modeling because we could easily set individual contact rates for the consumers or have multiple companies advertising competing products. All these aspects cannot easily be modeled using System Dynamics.
from BPTK_Py import Modelfrom BPTK_Py import sd_functions as sdfrom BPTK_Py import Agentfrom BPTK_Py import Modelfrom BPTK_Py import Eventfrom BPTK_Py import DataCollectorfrom BPTK_Py import SimultaneousScheduler
Setting up agents is actually quite simple - all you need to do is register handlers for the events and define the
method.`act`
class Consumer(Agent):def initialize(self):self.agent_type = "consumer"self.state = "potential"self.register_event_handler(["potential"],"advertising_event",self.handle_advertising_event)self.register_event_handler(["potential"],"word_of_mouth_event",self.handle_word_of_mouth_event)def handle_advertising_event(self,event):if self.is_event_relevant(self.model.advertising_success):self.state="customer"def handle_word_of_mouth_event(self, event):if self.is_event_relevant(self.model.word_of_mouth_success):self.state="customer"def act(self,time,round_no,step_no):# consumers who are customers generate word of mouth eventsif self.state == "customer":self.model.random_events("consumer",
Note that the company agent defined below accesses the propertiesself.contact_rate,lambda agent_id: Event("word_of_mouth_event", self.id, agent_id))
and ``advertising_budget`
`. These properties are defined in the scenarios and can then be accessed "magically" as either agent properties or model properties.consumers_reacher_per _euro
The model itself needs a way of instantiating agents - for this you register agent factories, which return an agent of a particular type. In their simplest form an agent factory is just a lambda function.class Company(Agent):def initialize(self):self.agent_type="company"self.state = "active"def act(self,time,round_no,step_no):self.model.random_events("consumer",self.advertising_budget*self.model.consumers_reached_per_euro,lambda agent_id: Event("advertising_event",self.id, agent_id))
NOTE: Running the agent-based model takes a little time, ca. 3 min on my machine.class CustomerAcquisitionAbm(Model):def instantiate_model(self):self.register_agent_factory("consumer", lambda agent_id,model,properties: Consumer(agent_id, model,properties))self.register_agent_factory("company", lambda agent_id,model, properties: Company(agent_id, model, properties))customer_acquisition_abm=CustomerAcquisitionAbm(1,60,dt=1,name="Customer Acquisition Agent-based Model",scheduler=SimultaneousScheduler(),data_collector=DataCollector())customer_acquisition_abm.instantiate_model()customer_acquisition_abm_config = {"runspecs": {"starttime": 1,"stoptime":60,"dt": 1.0},"properties":{"word_of_mouth_success":{"type":"Double","value":0.01},"advertising_success":{"type":"Double","value":0.1},"consumers_reached_per_euro":{"type":"Integer","value":100}},"agents":[{"name":"company","count":1,"properties":{"advertising_budget":{"type":"Integer","value":100}}},{"name":"consumer","count":60000,"properties":{"contact_rate":{"type":"Integer","value":10}}}]}customer_acquisition_abm.configure(customer_acquisition_abm_config)
customer_acquisition_abm.run()[customer_acquisition_abm.statistics().get(1.0*key) for key in range(1,5)][{'company': {'active': {'count': 1,'advertising_budget': {'total': 100,'max': 100,'min': 100,'mean': 100.0}}},'consumer': {'potential': {'count': 60000,'contact_rate': {'total': 600000, 'max': 10, 'min': 10, 'mean': 10.0}}}},{'company': {'active': {'count': 1,'advertising_budget': {'total': 100,'max': 100,'min': 100,'mean': 100.0}}},'consumer': {'potential': {'count': 58982,'contact_rate': {'total': 589820, 'max': 10, 'min': 10, 'mean': 10.0}},'customer': {'count': 1018,'contact_rate': {'total': 10180, 'max': 10, 'min': 10, 'mean': 10.0}}}},{'company': {'active': {'count': 1,'advertising_budget': {'total': 100,'max': 100,'min': 100,'mean': 100.0}}},'consumer': {'potential': {'count': 57881,'contact_rate': {'total': 578810, 'max': 10, 'min': 10, 'mean': 10.0}},'customer': {'count': 2119,'contact_rate': {'total': 21190, 'max': 10, 'min': 10, 'mean': 10.0}}}},{'company': {'active': {'count': 1,'advertising_budget': {'total': 100,'max': 100,'min': 100,'mean': 100.0}}},'consumer': {'potential': {'count': 56717,'contact_rate': {'total': 567170, 'max': 10, 'min': 10, 'mean': 10.0}},'customer': {'count': 3283,'contact_rate': {'total': 32830, 'max': 10, 'min': 10, 'mean': 10.0}}}}]
Setting up Scenarios
The scenario mechanism works exactly the same for SD DSL, Agent-based an hybrid models. This ensures that you can keep load different kinds of models and compare results!
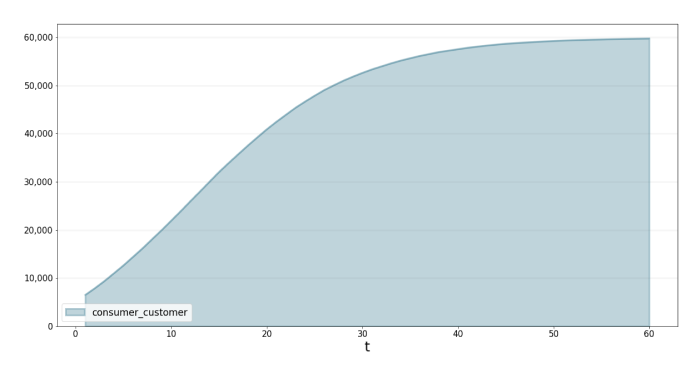
import BPTK_Pybptk = BPTK_Py.bptk()customer_acquisition_abm.reset()abm_scenario_manager={"abm_customer_acquisition":{"name":"abm_customer_acquisition","type":"abm","model":customer_acquisition_abm,"scenarios":{"base":{"runspecs": {"starttime": 1,"stoptime":60,"dt": 1.0},"properties":{"word_of_mouth_success":{"type":"Double","value":0.01},"advertising_success":{"type":"Double","value":0.1},"consumers_reached_per_euro":{"type":"Integer","value":100}},"agents":[{"name":"company","count":1,"properties":{"advertising_budget":{"type":"Integer","value":100}}},{"name":"consumer","count":60000,"properties":{"contact_rate":{"type":"Integer","value":10}}}]}}}}bptk.register_scenario_manager(abm_scenario_manager)bptk.plot_scenarios(scenario_managers=["abm_customer_acquisition"],scenarios=["base"],agents=["consumer"],agent_states=["customer"],progress_bar=True)
Output()
NOTE: especially for larger models it is much better to keep the model and the scenario definitions in separate files, which of course is also possible. See the online documentation and a detailed tutorial for illustrations of how this can be done.
The Best of Both Worlds: Hybrid ABM And SD Models
Hybrid models are agent based models that "contain" a System Dynamics model. The agents can call the elements of the SD model. The SD model elements can also call properties on the agent-based model via user defined sd functions.
Setting up The Model
from BPTK_Py import Modelfrom BPTK_Py import sd_functions as sdfrom BPTK_Py import Agentfrom BPTK_Py import Modelfrom BPTK_Py import Eventfrom BPTK_Py import DataCollectorfrom BPTK_Py import SimultaneousSchedulerclass Customer(Agent):def initialize(self):self.agent_type = "customer"self.state = "active"
The following code illustrates how to set up a system dynamics model as a Python class.
class CustomerAcquisitionSD():def __init__(self,model):self.model = model# stocksself.customers = model.stock("customers")#flowsself.customer_acquisition=model.flow("customer_acquisition")#convertersself.acquisition_through_advertising = model.converter("acquisition_through_advertising")self.acquisition_through_word_of_mouth = model.converter("acquisition_through_word_of_mouth")self.consumers_reached_through_advertising = model.converter("consumers_reached_through_advertising")self.consumers_reached_through_word_of_mouth= model.converter("consumers_reached_through_word_of_mouth")self.market_saturation = model.converter("market_saturation")#constantsself.initial_customers = model.constant("initial_customers")self.target_market= model.constant("target_market")self.advertising_success = model.constant("advertising_success")self.consumers_reached_per_euro = model.constant("consumers_reached_per_ruro")self.advertising_budget = model.constant("advertising_budget")self.word_of_mouth_success = model.constant("word_of_mouth_success")self.contact_rate = model.constant("contact_rate")#equationsself.customers.equation = self.customer_acquisitionself.customer_acquisition.equation=self.acquisition_through_advertising+self.acquisition_through_word_of_mouthself.acquisition_through_advertising.equation = self.advertising_success*self.consumers_reached_through_advertisingself.consumers_reached_through_advertising.equation = self.consumers_reached_per_euro*self.advertising_budget*(1-self.market_saturation)self.market_saturation.equation = self.customers/self.target_marketself.acquisition_through_word_of_mouth.equation = self.word_of_mouth_success*self.consumers_reached_through_word_of_mouthself.consumers_reached_through_word_of_mouth.equation=self.contact_rate*self.customers*(1-self.market_saturation)#initialize modelself.customers.initial_value=self.initial_customersself.initial_customers.equation = 0.0self.target_market.equation = 60000.0self.advertising_success.equation = 0.1self.consumers_reached_per_euro.equation = 1.0self.advertising_budget.equation = 100.0self.word_of_mouth_success.equation = 0.01self.contact_rate.equation = 1.0class CustomerAcquisitionHybrid(Model):def instantiate_model(self):super().instantiate_model()# register agent factoriesself.register_agent_factory("customer", lambda agent_id,model,properties: Customer(agent_id, model,properties))# set up the sd model - keep it in its own class so we can use the SD DSLself.sd_model = CustomerAcquisitionSD(self)def configure(self,config):super().configure(config)## the config sets the model properties, which we need to set the initial values of the sd modelself.sd_model.target_market.equation = self.target_marketself.sd_model.advertising_success.equation = self.advertising_successself.sd_model.consumers_reached_per_euro.equation = self.consumers_reached_per_euroself.sd_model.advertising_budget.equation = self.advertising_budgetself.sd_model.word_of_mouth_success.equation = self.word_of_mouth_successself.sd_model.contact_rate.equation = self.contact_ratedef begin_round(self, time, sim_round, step):# at the beginning of each round we check to see how many customers we should have according to the# SD model and then create the right number of agents.required_num_customers = int(self.evaluate_equation("customers",time))current_num_customers = self.agent_count("customer")agents_needed = required_num_customers-current_num_customersself.create_agents({"name":"customer","count":agents_needed})customer_acquisition_hybrid=CustomerAcquisitionHybrid(1,60,dt=1,name="Customer Acquisition Hybrid",scheduler=SimultaneousScheduler(),data_collector=DataCollector())customer_acquisition_hybrid.instantiate_model()customer_acquisition_hybrid_config = {"runspecs": {"starttime": 1,"stoptime":60,"dt": 1.0},"properties":{"word_of_mouth_success":{"type":"Double","value":0.01},"advertising_success":{"type":"Double","value":0.1},"consumers_reached_per_euro":{"type":"Double","value":100.0},"advertising_budget":{"type":"Double","value":100.0},"contact_rate":{"type":"Double","value":10.0},"target_market":{"type":"Double","value":60000.0}},"agents":[{"name":"customer","count":0}]}customer_acquisition_hybrid.configure(customer_acquisition_hybrid_config)customer_acquisition_hybrid.run()[customer_acquisition_hybrid.statistics().get(1.0*key) for key in range(2,10)][{'customer': {'active': {'count': 1000}}},{'customer': {'active': {'count': 2081}}},{'customer': {'active': {'count': 3247}}},{'customer': {'active': {'count': 4500}}},{'customer': {'active': {'count': 5842}}},{'customer': {'active': {'count': 7272}}},{'customer': {'active': {'count': 8790}}},{'customer': {'active': {'count': 10393}}}]
Setting up Scenarios
import BPTK_Pybptk = BPTK_Py.bptk()customer_acquisition_hybrid.reset()hybrid_scenario_manager={"hybrid_customer_acquisition":{"name":"hybrid_customer_acquisition","type":"abm","model":customer_acquisition_hybrid,"scenarios":{"base":{"runspecs": {"starttime": 1,"stoptime":60,"dt": 1.0},"properties":{"word_of_mouth_success":{"type":"Double","value":0.01},"advertising_success":{"type":"Double","value":0.1},"consumers_reached_per_euro":{"type":"Double","value":100.0},"advertising_budget":{"type":"Double","value":100.0},"contact_rate":{"type":"Double","value":10.0},"target_market":{"type":"Double","value":60000.0}},"agents":[{"name":"customer","count":0}]}}}}bptk.register_scenario_manager(hybrid_scenario_manager)bptk.plot_scenarios(scenario_managers=["hybrid_customer_acquisition"],scenarios=["base"],agents=["customer"],agent_states=["active"],progress_bar=True)
Output()
NOTE: especially for larger models it is much better to keep the model and the scenario definitions in separate files, which of course is also possible. See the online documentation and a detailed tutorial for illustrations of how this can be done.
XMILE Model
Many modelers prefer to build models using visual modeling environments and not directly in code. One such environment is Stella Architect. Using Stella Architect, you can build System Dynamics models visually. You can then import them into Python using BPTK and then work with them much like with any other model.
The framework automatically re-transpires the XMILE model if changes are made in the visual modeling environment. So you can model in Stella Architect and experiment with scenarios in Jupyter.
Transpiled models work stand-alone, so you can run them anywhere independently of the modeling environment.
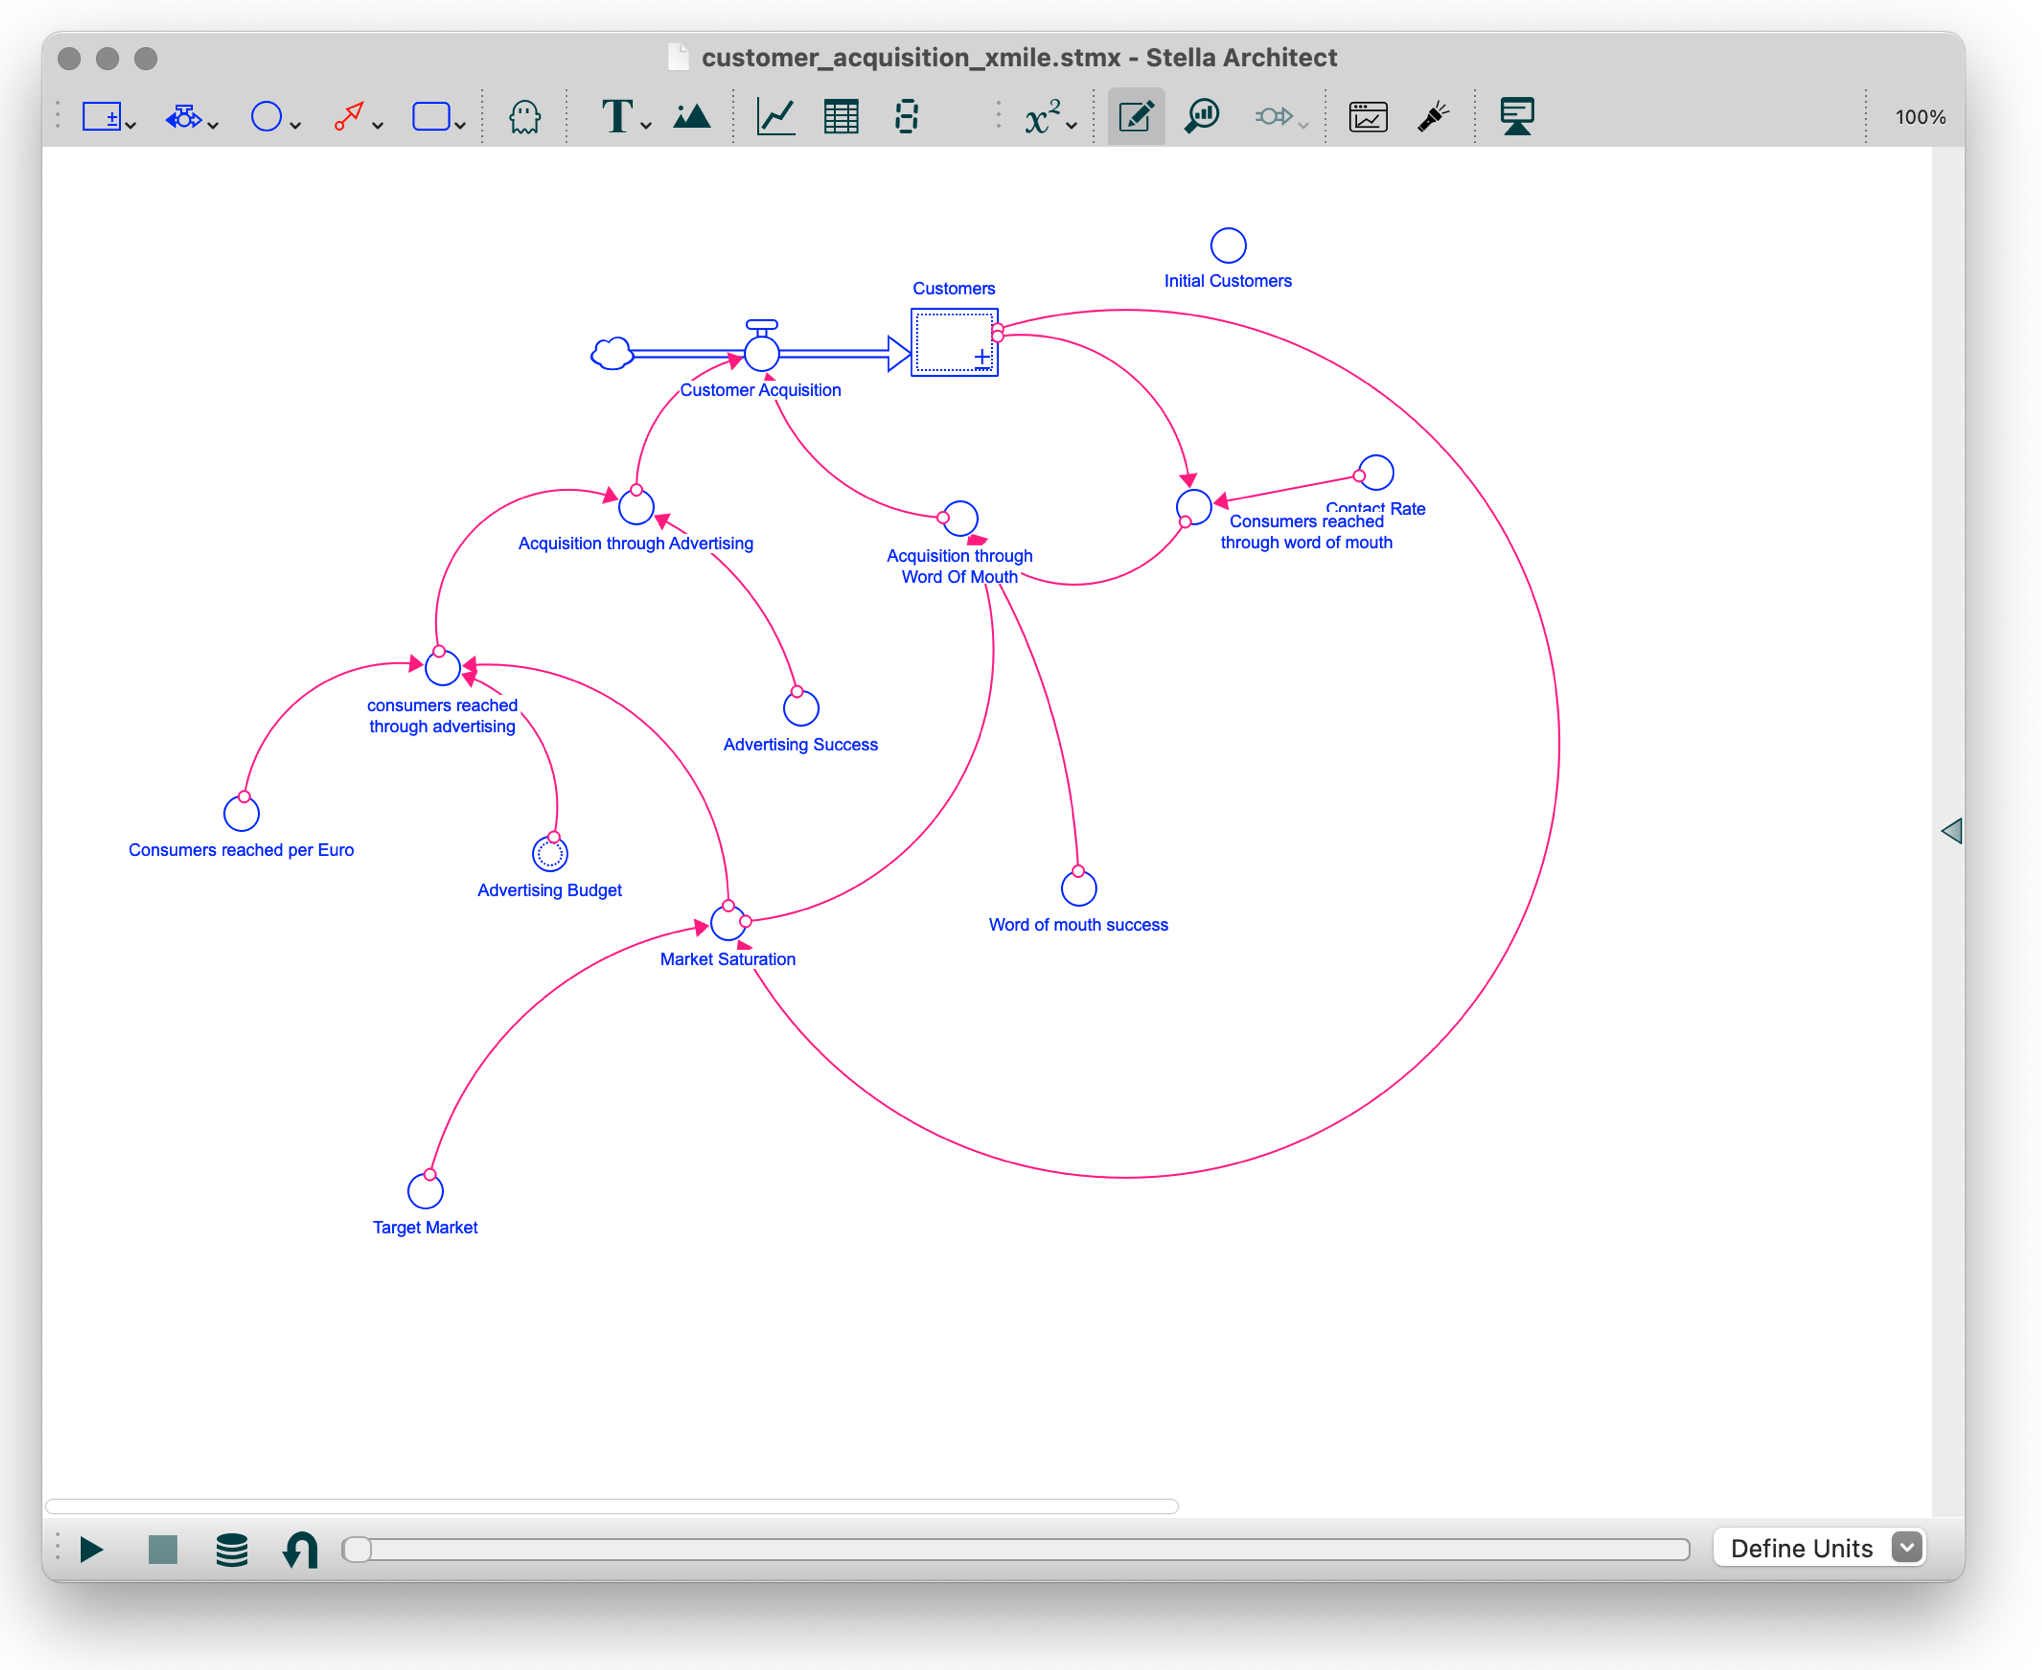
Setting up The Model
This is what our customer acquisition model looks like in Stella Architect:
Setting up The Scenarios
To work with XMILE models, all we have to do is set up a scenario file in the
folder.scenarios
The scenario file tells the framework where to find the XMILE model and which scenarios to set up.
In our case the file looks like this - the only difference to the SD DSL scenario definition is the inclusion of the XMILE source.
{"xmile_customer_acquisition":{"source":"simulation_models/customer_acquisition_xmile.stmx","model":"simulation_models/customer_acquisition_xmile","scenarios":{"base": { },"low_word_of_mouth":{"constants":{"wordOfMouthSuccess":0.001}},"high_word_of_mouth":{"constants":{"wordOfMouthSuccess":0.1}}}}}
As soon as we instantiate bptk, the framework automatically searches the scenarios folder for scenarios and loads them.
import BPTK_Pybptk = BPTK_Py.bptk()
Let us list all the scenarios and equations the framework finds.
bptk.list_equations(scenario_managers=["xmile_customer_acquisition"],scenarios=[])
Available Equations:
Scenario Manager: xmile_customer_acquisitionScenario: base--------------------------stock: customersflow: customerAcquisitionconverter: acquisitionThroughAdvertisingconverter: acquisitionThroughWordOfMouthconverter: advertisingBudgetconverter: advertisingSuccessconverter: consumersReachedPerEuroconverter: consumersReachedThroughAdvertisingconverter: consumersReachedThroughWordOfMouthconverter: contactRateconverter: initialCustomersconverter: marketSaturationconverter: targetMarketconverter: wordOfMouthSuccessScenario: low_word_of_mouth--------------------------stock: customersflow: customerAcquisitionconverter: acquisitionThroughAdvertisingconverter: acquisitionThroughWordOfMouthconverter: advertisingBudgetconverter: advertisingSuccessconverter: consumersReachedPerEuroconverter: consumersReachedThroughAdvertisingconverter: consumersReachedThroughWordOfMouthconverter: contactRateconverter: initialCustomersconverter: marketSaturationconverter: targetMarketconverter: wordOfMouthSuccessScenario: high_word_of_mouth--------------------------stock: customersflow: customerAcquisitionconverter: acquisitionThroughAdvertisingconverter: acquisitionThroughWordOfMouthconverter: advertisingBudgetconverter: advertisingSuccessconverter: consumersReachedPerEuroconverter: consumersReachedThroughAdvertisingconverter: consumersReachedThroughWordOfMouthconverter: contactRateconverter: initialCustomersconverter: marketSaturationconverter: targetMarketconverter: wordOfMouthSuccess
We directly plot the scenarios:
bptk.plot_scenarios(scenario_managers=["xmile_customer_acquisition"],scenarios=["base","high_word_of_mouth","low_word_of_mouth"],equations=["customers"],series_names={"xmile_customer_acquisition_base_customers":"Base","xmile_customer_acquisition_low_word_of_mouth_customers":"Low Word of Mouth","xmile_customer_acquisition_high_word_of_mouth_customers":"High Word of Mouth",})
NOTE: Once the XMILE file has been transpiled into a Python model, the framework is independent of the XMILE file. All simulation is done in Python. The software that was used to create the XMILE file is not needed by the BPTK framework.
Further Examples
To learn more about the BPTK framework, you can find extensive documentation online and also a detailed tutorial on GitHub.
You can also find more advanced examples on GitHub:
- Covid Simulation. Jupyter notebooks and dashboards illustrating the SIR model.
- Covid Simulation Dashboard. A web-based simulation dashboard for the COVID simulation built using our BPTK Widgets library for Javascript. View a live version of the dashboard online.
- Beer Distribution Game. In-depth analysis of the beer distribution game using both System Dynamics and Agent-based simulation. Includes an illustration of how to use BPTK in conjunction with reinforcement learning to train agents to play the beer distribution game autonomously.
Get in Touch
Please let us know if you need help getting started if you find a bug or are missing important functionality.
A good place to get in touch is our Business Prototyping Toolkit Meetup, which gathers online monthly. This is a convenient setting to see BPTK in action, ask questions and suggest new features.
You can also reach us per e-mail at support@transentis.com
Table of Contents
- Key Components of The Business Prototyping Toolkit
- Example Model: Simulating Customer Acquisition Using The Bass Diffusion Model
- Building The Customer Acquisition Model With SD DSL
- Setting up Scenarios
- The Best of Both Worlds: Hybrid ABM And SD Models
- XMILE Model
- Setting up The Model
- Further Examples
- Get in Touch
Upcoming EventsEvents overview
Upcoming Events


Events overview


Resources
All Rights Reserved.